OAuth 2.0, commonly pronounced “oh-auth”, is an industry-standard framework for *authentication and *authorization based on tokens. The OAuth (Open Authorization) delegates to a Service to allow a third party Application to access user account information on behalf of him(her), with their previous authorization.
It is, indeed, a little bit boring the formal explanations that we usually found when googling “what the h… is OAuth”, and also how this framework works. So… let’s try to make the theoretical part a little short, direct and easy to understand, with some drawings and short explanations. This way, and still with enough theoretical content, we can slip faster to the enjoyable part: the sample coding.
We already mentioned what is OAuth2 at the beginning of this article, you wanna hear again? In only three words? An industry-standard framework, that’s it! The rest, and the most important, is more about to know how it works and how to implement (to use it in your day-to-day design solutions needs).
Now speaking in a more formal tone… For a long and complete OAuth 2.0 site theory source, check its IETF specification: RFC-6749. It’s also very useful to keep it in mind when some doubts come up. It is important to mention that this is a specification that (as much of them) do not define all the very thin details of the discussed technology implementation. So, that’s why it is likely and easy to find some deep differences between two distinct proprietary implementations of this same framework, the OAuth 2.0. I suggest you to have some of the most basic important concepts of what is, what can you do with it, how it basically works, and then… go deeper to the docs and manuals of the provider (Google, Facebook, LinkedIn , etc.) of some the API, that is built using a implementation of this framework specification.
Ah! before going on, one more thing… everything that we discuss here is about OAuth 2.0, even though you found only the word OAuth, I meant OAuth 2.0. The OAuth 2.0 is not backwards compatible with the OAuth 1.0.
*Authentication is a process that answer a simple question: Are you, in fact, who you are saying who you are?
In simple terms: Are you really you?
*Authorization is a process that answer a simple question: Are you allowed to perform these tasks or access those information?
In simple terms: Does your mother (or wife, or both) let you do this?
The Characters
Let’s start presenting the characters involved in to this story called OAuth 2.0:
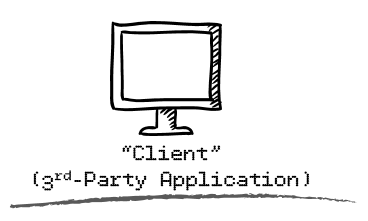 |
Third-Party Application or simply the “Client” |
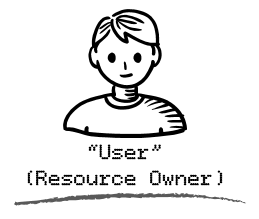 |
The Resource Owner or simply the “User” ( that’s usually You! ) |
 |
The Resource Server or simply the “API Server” |
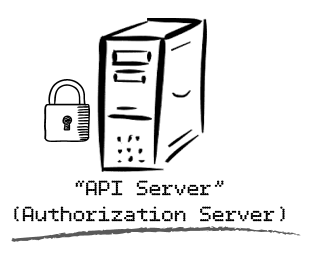 |
The Authorization Server or simply the “API Server” |
Have you noticed? We are calling both the Authorization Server and the Resource Server of “API Server”. That’s because this role is almost always played (in reasonably small implementations) by the same character, that is, a Provider. Like we have already mention before: Facebook, Google, Twitter, etc, those might be the Authorization Server, besides also being the Resource Server. Let’s named them of “API Server”.
The Flow
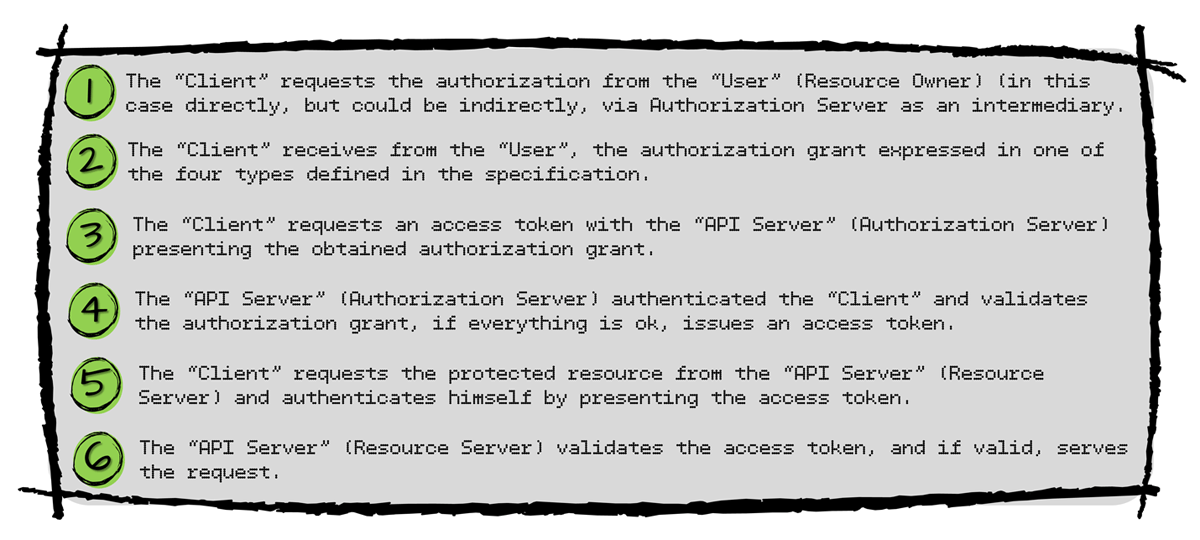
The details of the sequence of events of how this framework behaves, it depends on the authorization grant used, but there is a generic flow that we can pretty much understand how is supposed to work according to its implementation, let’s see it:

The Badge (Authorization Grant)
The authorization grant it is the credential, that represents the “User” (Resource Owner) authorization, used by the “Client” (3rd-Party Application) to obtain an Access Token. That means… that’s the invitation given by the user for you to be able to join the party. Without it, you cannot go any further. On the contrary… if the user “invites” (authorize) you, then you will have a badge (Access Token) to access some parts of his “home” (will be able to access their account information). There are four grant types useful for different use cases, let’s see some of its basics according to the specification RFC-6749:
- Authorization Code:
- Ideally for browser-based or mobile applications.
- The “API Server” (Authorization Server) intermediates the acquisition of the authorization between the “User”(Resource Owner) and the “Client” (3rd-Party Application). The “User” (Resource Owner) authenticates himself with the “API Server” (Authorization Server), that afterwards, redirects the result, with the authorization code, to the “Client” (3rd-Party Application). With the authorization code in hands, the “Client” (3rd-Party Application) is able to ask for the Access Token to the “API Server” (Authorization Server), and then… use his “invitation” to retrieve “User” account information.
- Implicit:
- Used in browsers using a scripting language such as Javascript.
- In this authorization grant type, there’s no authorization code issued, actually the Access Token is given directly as a result of the “User” (Resource Owner) authorization. That’s different from the aforementioned authorization grant type explained before that the “Client” (3rd-Party Application) makes two separate request: one for authorization, and the other for the access token. At the Implicit grant type, there’s no two steps communication with the “API Server” (Resource/Authorization Server). This type was superseded, is more used/prefered over the previous one explained.
- Resource Owner Password Credentials:
- This authorization grant type simply is… use the password and username of the “User” (Resource Owner) directly as an authorization grant to obtain the access token. Of course, this means that there is a high degree of trust between the “User” (Resource Owner) and the “Client” (3rd-Party Application), most likely the “Client” (3rd-Party Application) is like a highly privileged application.
- Client Credentials:
- As the credentials mentioned here is the one presented by the own “Client” (3rd-Party Application), this grant type is used when the authorization scope over the protected resources (the information under the control of the “User” – Resource Owner) is limited to access of this same “Client” (3rd-Party Client), that is, the “Client” owner of the Credentials. This authorization grant type is typically used when the “Client” (3rd-Party Application) is also the “User” (Resource Owner), and it is performing an action on it own behalf, or… is requesting access to protected resources based on an authorization previously agreed with the “API Server” (Authorization Server).
- Two-legged authentication: is when the “Users” (Resource Owner) are not (directly) involved, and the “Client” (3rd-Party Application) interacts direct with the “API Server” (Authorization / Resource Server) for authentication/authorization. Example: Client Credentials grant type.
- Three-legged authentication: is when all the authorization/authentication process happens between the “Users” (Resource Owner) and the “API Server” (Authorization Server), without the direct “presence” of the “Client” (3rd-Party Application). Here, it is necessary the user’s interaction to give his consent, and the “Client” (3rd-Party Application) will not “watch” this happens. Example: Authorization code grant type.
Now, Let’s Prove it!
In order to write some code and “taste” this framework known by the name OAuth 2.0, we have to choose some Service (that will play the role of Authorization and Resource Server) that offers and implements this kind of solution. In addition we also have to choose which type of the authorization grant (one of the four available by the specification, explained here above) we’re going to use. Of course, the Service (Authorization Server) chosen must support the authorization grant type in question.
Let’s coding for two different authorization grant type, and for each one of them we are going to use either two distinct API Services available out there. And those are:
- Google Gmail API Service (https://developers.google.com/gmail/api/)
- Google Cloud Pub/Sub API Service (https://cloud.google.com/pubsub/)
Observation: This article is divided in two Parts, and in the second one we are going to write regarding the Client Credentials grant type using the Google Cloud Pub/Sub API Service as example. At this part one, we will keep with the Authorization Code grant type, using the Gmail API Service.
There are two steps, in common for both coding samples, that need to be performed before: (1) Register the Application Credentials (for our “Client” 3rd-Party Application) and (2) enable te use of the google’s APIs for the Application, so afterwards we start the coding.
Register The Application (“Client” / 3rd-Party Application)
In our two coding samples, both the Authorization Code grant type, as well the Client Credentials grant type, we must have previously registered our application with the “API Server” (Resource Server), to be able to use the security services in OAuth 2.0 format.
Suppose you are developing an Application that wants to have access to user’s gmail mailbox, properly granted by himself. The first thing to do is to register our Web Application at the Google API Service. When registered, we will be able to create the credentials for our Web Application, and then use this credentials to access the APIs Services. That’s the way the Google’s API Services is able to identify our application. Let’s go for it.
- Open the Credentials Page of the Google Developers API Console: https://console.developers.google.com/apis/credentials (log to your account will be asked);
- Create, or choose, one of your projects at the Google API Console (on the top left corner, on the side of the Google APIs icon, you can find a Combo-box with your projects or the option to create a new one);
- Now, finally the Credentials: Click Create credentials → OAuth client ID. And then we have…

- At the listed Credentials page, we have an option that allows us to download all the information of our Application in a JSON file format. Download it, we might need later.

Enable the use Google APIs for the Application
Besides the chosen/creation of the Application, we need to enable the APIs that we have in mind to use, this is the place to do it: https://console.developers.google.com/apis/library (remember: choose the project on the top left corner of the page); Choose the Gmail API and enable it (Gmail API and Cloud Pub/Sub).
Coding…
Accessing Google Gmail API via OAuth 2.0 (Authorization Code Grant Type)
Our created application (“Ualter OAuth Sandbox”) needs to have access to the Gmail inbox on behalf of their users, with their authorization. Let’s follow the flow’s sequence of the grant type (Authorization Code) in question.
1. Requesting the Authorization of the “User” (Resource Owner)
Here we will ask for permissions to access the Gmail account of a user of our application.
-
- response_type: Fixed value, telling google that you want a authorization code in the response. In our case, is “code”.
- client_id: The client ID of your registered application. Remember the JSON we have downloaded? Over there you can find this info, or also at the Google Developers API Console.
- redirect_uri: The name self-explain its purpose, that’s where the response goes to after the “User” (Resource Owner) has given (or not) the authorization. Take care with the value here, because it must match with of one of those informed when you have registered your Application at the API Console, otherwise will not work.
- scope: Enable users to control the amount of access that they grant to your application. That’s a list of scopes that identify the resources that your application could access on the user’s behalf.

As we have seen before, in authorization code grant type flow, it is necessary to have a direct interaction with the “User” (Resource Owner) in order to ask per authorization. Let’s put the SoapUI in action for this case, and simulate the request of the user, because with this tool, it still will be possible to have the HTML pages rendered and interact with user to perform the whole flow. This is what we will get after sending the request for authorization:
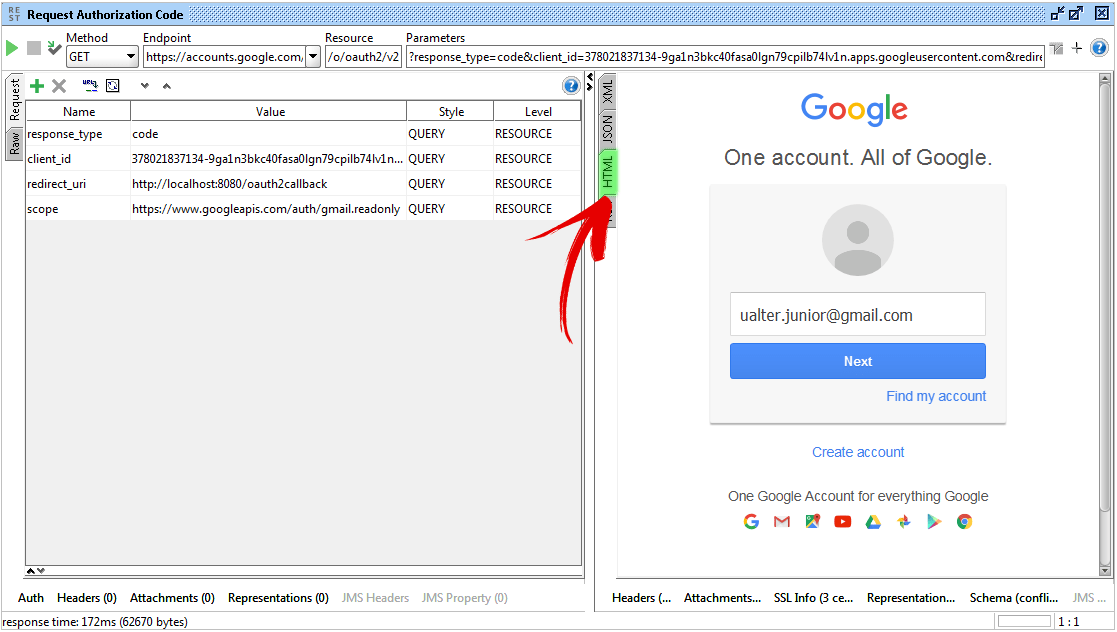
After the user authenticate himself, we can see the name of our registered application at the Google API Console, and also the scope of our request for access grant:
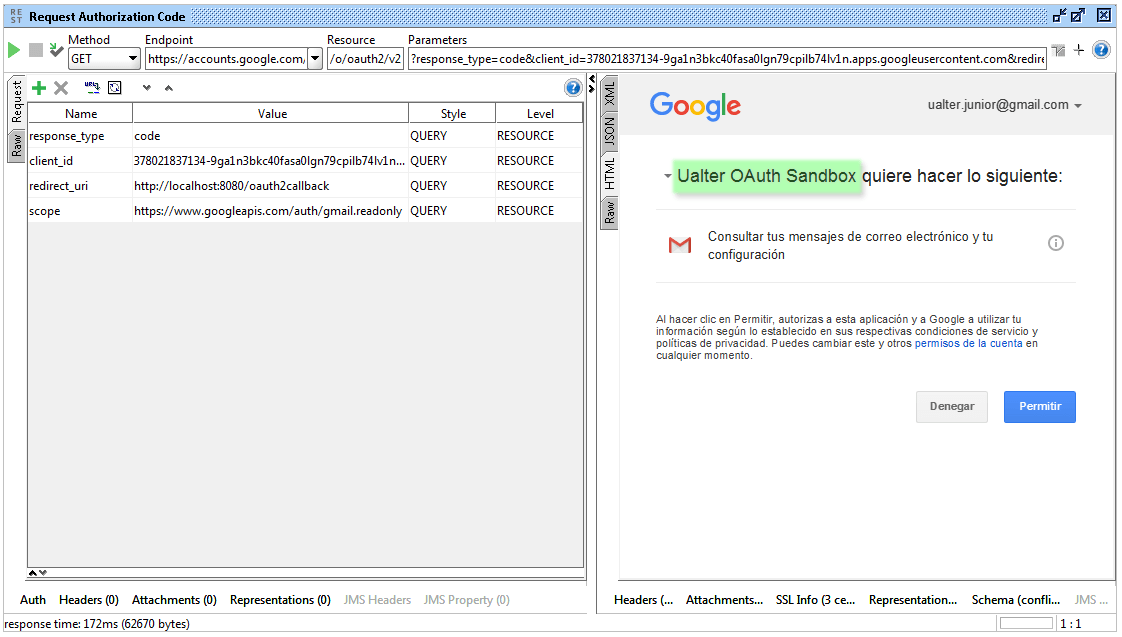
Wait a minute! Before going forward ant hit the Allow button, to give the user’s authorization, we have to have something listening at the redirect_uri URL, right? Otherwise the Authorization Code will no be received for any part of our 3rd-Party Application (at least automatically, as would be in a real world application). Then…
For this mission, we will code a plain small NodeJS Javascript code, that will be listening at the redirect_uri informed, and simulate our server-side application receiving the result (and performing a little bit more steps afterwards, we will see). So… run the command below and start our “Application Server-Side” component:

Wait to get it listening at defined URL and Port…

And then we are ready to go… (In the SoapUI HTML response, hit the button Allow at the time you want).
2. Receiving the Authorization Grant of the “User” (Resource Owner)
Ok, after the user grant the permission (or deny), the “API Server” (Authorization Server) will use the redirect_uri parameter to send the result back to us, to our application. In case the user has granted the permission, we are now prepared to receive the Authorization Code. Let’s take a look inside our server-side Node JS coding:

- In the first highlight (line 12) we can see the URI that our Application is listening to, at the port 8080, using the authorized redirect URL we have informed when we registered our application.
- In the second highlight (line 20), we receive the authorization code given by the user’s consent coming with the redirected Request. As we have seen our application does not interact directly with the User to ask the authorization, this action is performed by the Authorization Server that intermediates everything, and at the end, redirect the result to us.
3. Requesting the Access Token with the “API Server” (Authorization Server)

- Now, with the authorization code received, in the highlighted lines from 24 to 26, we trigger the HTTP POST Request to retrieve the access token from the “API Server” (Authorization Server)
4. Interacting the the Gmail API Services (Resource Server)
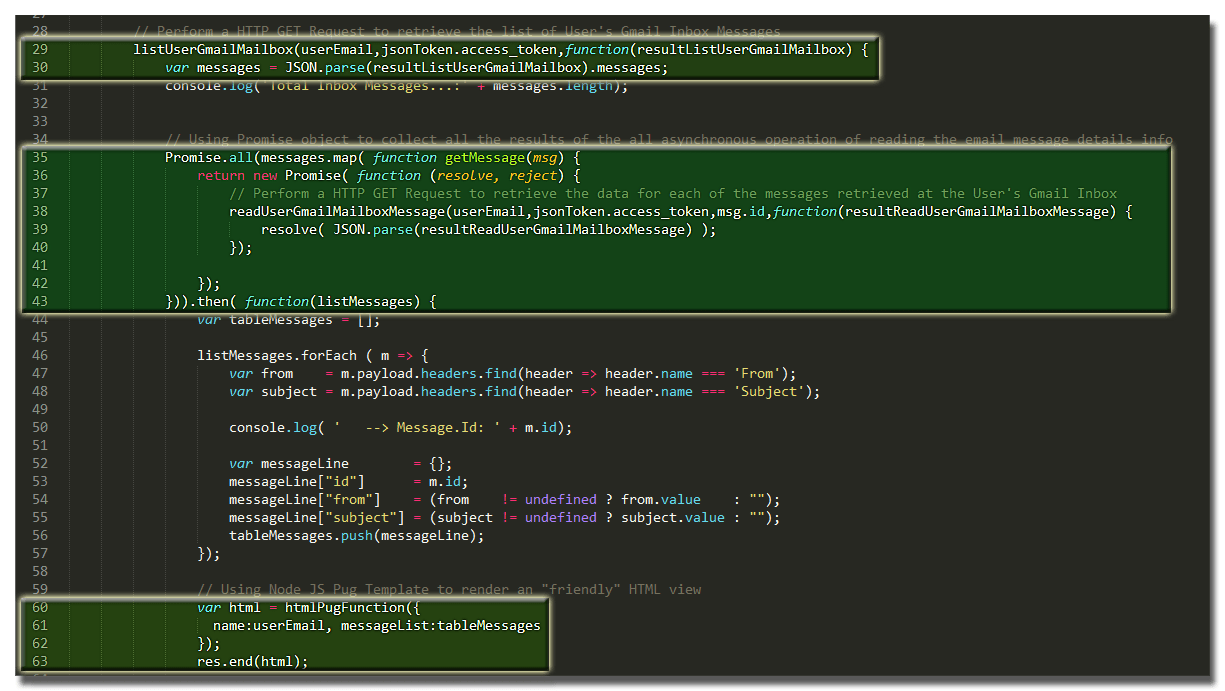
- At the lines 29 and 30, when we finally have all that we need to use the Gmail API Services (User’s consent, the given Authorization Code and the retrieved Access Token) we start to use them. Here, we are triggering a HTTP GET Request to retrieve a list of messages that the User has at his Gmail Inbox.
- A the highlighted lines from 35 through 43, we are performing the last step of the processing before send the result rendered to the user interacting with our application (remember our Application is the “Client” 3rd-Party Application at this story). In this step we are reading the Users’s Gmail Inbox messages, one-by-one, to retrieve details information about each one (like Subject, From, To, Labels, etc.). Through a HTTP GET Request we send to Gmail API Service the request (informing the messages’s ID) and get back the information we want. An extra information: As one of the characteristics of Node JS is perform operations in an asynchronously communication mode, we can’t send all of the these requests in this way, otherwise our thread will not have a chance to render them in the response to the User (rendering in a HTML format view). That’s why we are using the Promises (https://www.promisejs.org/) object, to collect all the results of all the asynchronous readUserGmailMailboxMessage operations, get together all of the results and then being possible to render at once the page to the user waiting the response.
- From line 60 to 63, we finished the participation of our Node JS coding returning back a response with the messages retrieved in a HTML format. In order to render the page, we construct a JSON Object with the information we want to “print”, that were all collected in the previous step, using the Promises object. Here, we are using Pug (https://pugjs.org), a template framework to help to deal with rendering information in Node JS, in our case, a very handy “friend” to help produce the desired HTML output result.
The Results!
After putting all the pieces running together and watching what happened, let’s see the results:
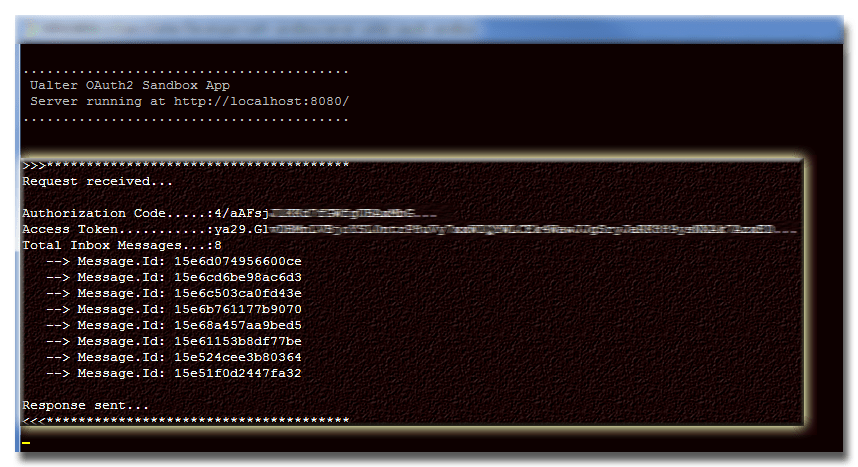
At the Server-Side Component Node JS
This is the logging result in the Node JS, during the transaction:
3rd-Party Application Server User Interface
And at the user’s 3rd-Party Application side, the interface presented in HTML format (generated by our friend Pug, the NodeJS template rendering framework) would be like that:

Conclusion
In this article we have tried to demystify a little bit the industry-standard framework OAuth 2.0, a framework to help deal with authorization and authentication based on Tokens. We went through some of its basic concepts, understanding by its specification what type of grants are available. Nothing better them go through a sample coding to understand what it is said by the theoretical part. At this Part I of II, we have written a sample to see the Authorization Code Grant Type in action, and in the Part II of this article we will see a sample of the Client Credentials Grant Type in action (useful in Server-to-Server communications), see you there at the second part, where you can already access through this link. See you!
https://github.com/ualter/oauth2-sandbox
