 In this two-part article about Cloud and Containers working together, here in the second part we will try out the AWS ECS (Elastic Container Service) using the EC2 Launch Type. In the first part(AWS ECS Fargate), besides some brief concepts, we’ve seen how to set up an AWS ECS environment and deploy a simple Docker application using Fargate launch type. Now, at part II, we will do the same but this time using the AWS ECS EC2 launch type, and then get a better vision of differences between the two, Fargate vs. EC2.
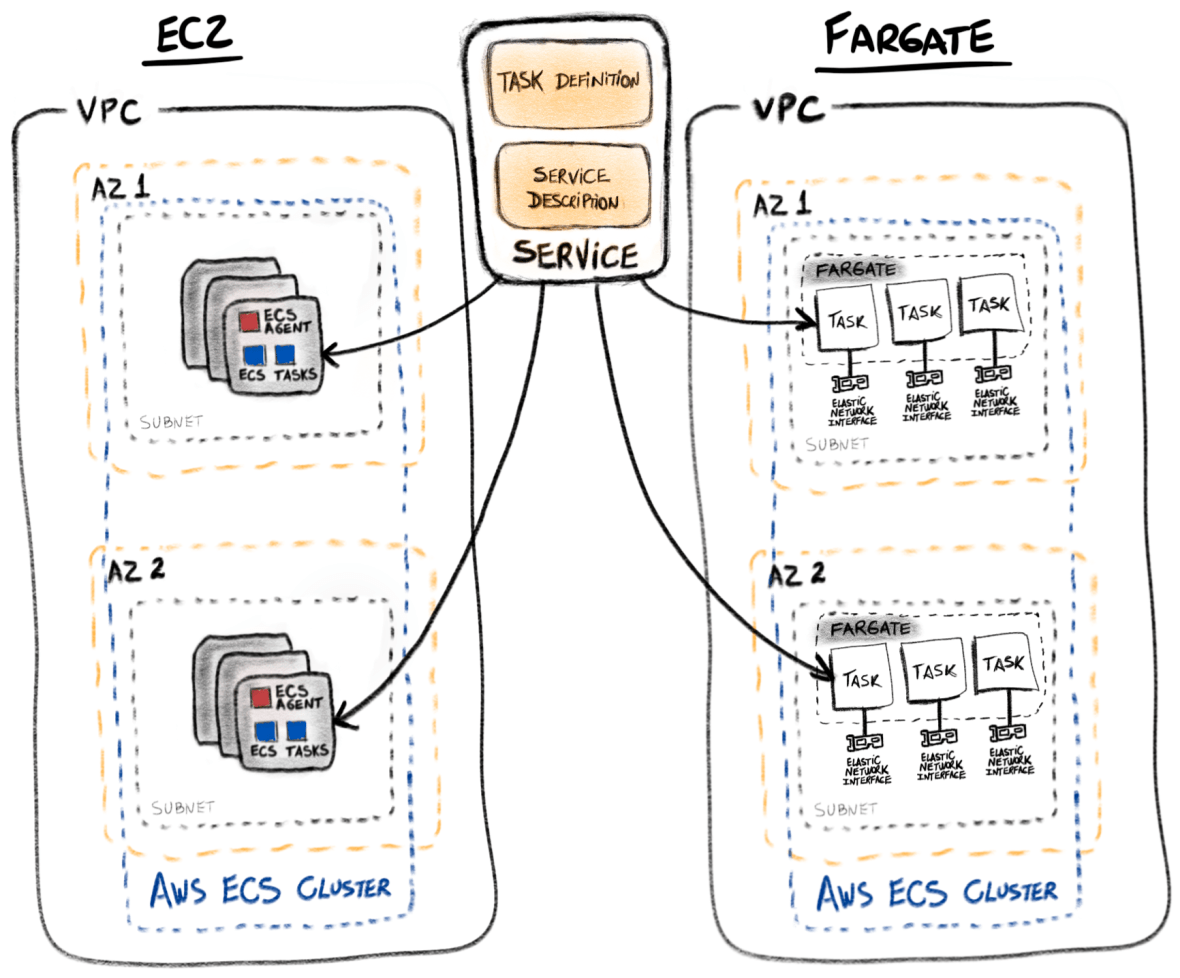
If you didn’t take a look at the explanation regarding the ECS launch types (EC2 and Fargate), in the first part you can find more information. In the architecture diagram below, comparing each one side-by-side, we will perform a Lab on what is drawn on the left side.
AWS ECS EC2 Lab
Let’s use the same Docker image example, available at Docker Hub. It is a very simple application Docker image built on Quarkus framework.
We are going to deploy it using AWS ECS with EC2 launch type, some of the steps of the Lab are exactly the same that we did in the first part. We will list those commands without too many details, as they were already explained before. When something gets different from the previous article, we get into more details, if needed.
As we stated at part I, we have some pre-requisites in order to be able to run this Lab, that’s the same for part II, so again…
“We will need an AWS account, the JQ tool (command-line JSON processor), and the AWS CLI locally installed and configured at the O.S. Bear in mind that the commands were tested in a Mac OS (Mojave) and Linux (Ubuntu) O.S., not on Windows. (Some commands will need syntax modifications to work on Windows, even if you use something like Git Bash)”.
Create an ECS Cluster and Task Definition
### Create the AWS ECS Cluster
$ aws ecs create-cluster --cluster-name "quarkus-ec2"

### Register the Task Definition
$ aws ecs register-task-definition --cli-input-json file://task-definition-host.json
Like in the first part, we create the Task Definition with a JSON file specifying the entry parameters. But, in this one, we have changed a few things in order to use the Task created by this Task Definition with the EC2 Launch Type. Specifically, the Network Mode and we remove the compatibility with the Fargate.
### File task-definition-host.json
{
  "family": "quarkus",
  "networkMode": "host",
  "requiresCompatibilities": ["EC2"],
  "cpu": "256",
  "memory": "512",
  "containerDefinitions": [
    {
      "name": "quarkus-app",
      "image": "ualter/quarkus-app:latest",
      "memoryReservation": 128,
      "cpu": 256,
      "memory": 512,
      "portMappings": [
        {
          "containerPort": 8080,
          "hostPort": 8080,
          "protocol": "tcp"
        }
      ],
      "command": [
        "./application", "-Dquarkus.http.host=0.0.0.0"
      ],
      "essential": true
    }
  ]
}
Create the AWS ELB – An Application Load Balancer
####### Load Balancer and its Target

### Choose a VPC
$ aws ec2 describe-vpcs | jq '.Vpcs[] | (" --------> VPC.....: " + .VpcId,.Tags,.CidrBlock)'

### Save its ID
$ VPC_ID=vpc-24ac8245

### Create the Target Group
$ aws elbv2 create-target-group --name "ECSQuarkusTargetGroup" --protocol HTTP --port 8080 --vpc-id $VPC_ID

### Create the Security Group (Ports 80, 8080)
$ SG_ID=$(aws ec2 create-security-group --description "quarkus-DMZ" --group-name "quarkus-DMZ" --vpc-id $VPC_ID | jq -r .GroupId)
## Tag the Security Group
$ aws ec2 create-tags --resources $SG_ID --tags 'Key=Name,Value=Quarkus-EC2-Instance'
## Create the Incoming Rules for Security Group (Allow incoming communication Ports 80 and 8080)
$ aws ec2 authorize-security-group-ingress --group-id $SG_ID --ip-permissions IpProtocol=tcp,FromPort=8080,ToPort=8080,IpRanges=[{CidrIp=0.0.0.0/0}] IpProtocol=tcp,FromPort=80,ToPort=80,IpRanges=[{CidrIp=0.0.0.0/0}] IpProtocol=tcp,FromPort=8080,ToPort=8080,Ipv6Ranges=[{CidrIpv6=::/0}] IpProtocol=tcp,FromPort=80,ToPort=80,Ipv6Ranges=[{CidrIpv6=::/0}]

### Create Load Balancer

## Save all the Subnets Ids for the Load Balancer
$ SUBNETS_IDS=$(aws ec2 describe-subnets --filters Name=vpc-id,Values=$VPC_ID | jq -r '.Subnets[].SubnetId' | tr '\n' ' ')
$ aws elbv2 create-load-balancer --name "ECSQuarkusLoadBalancer" --subnets $SUBNETS_IDS --security-groups $SG_ID

## Create a Listener for ELB - Associate this Target Group to ELB
# Save the ELB ARN
$ ELB=$(aws elbv2 describe-load-balancers | jq -r '.LoadBalancers[] | select( .LoadBalancerName | contains("ECSQuarkus")) | .LoadBalancerArn')
# Save the Target Group ARN
$ TARGET_GROUP=$(aws elbv2 describe-target-groups \
| jq -r '.TargetGroups[] | select( .TargetGroupName | contains("ECSQuarkus")) | .TargetGroupArn')
# Create Listener for the Load Balancer with the created Target Group
$ aws elbv2 create-listener --load-balancer-arn $ELB \
--protocol HTTP --port 8080 \
--default-actions Type=forward,TargetGroupArn=$TARGET_GROUP
Ok, up to this point we have done similar things in comparison with the setup for the AWS ECS Fargate, let’s summarize it:
- Create an ECS Cluster
- Create a Task Definition
- Create a Security Group and its incoming rules
- Create/Select VPC
- Create a Target Group
- Create an Application Load Balancer
- Add the Target Group to the ALB (creating a Listener)
Now we are going to start to perform operations that it is only necessary because we are going to configure an AWS ECS EC2 environment.
EC2 AutoScaling Configuration
As we mentioned before, regarding the differences between Fargate and EC2 launch type, here we can see something that is specifically necessary only when using the EC2 launch type, that is, provisioning and manage EC2 Instances.
In order to operate the EC2 Instances we need, we will use an available resource at AWS for this need, the AutoScaling service. It is correct that we could create the EC2 Instances to our AWS ECS Cluster manually, but let’s do the right thing, let’s provisioning and manage those EC2 Instances automatically using the AutoScaling. Later on, when necessary, we could use some metrics and alarm monitoring in order to scale out and in the EC2 Instances part of this ECS Cluster.
To be able to create an AutoScaling service we need to have some key parameters previously chosen and defined. Those parameters are:
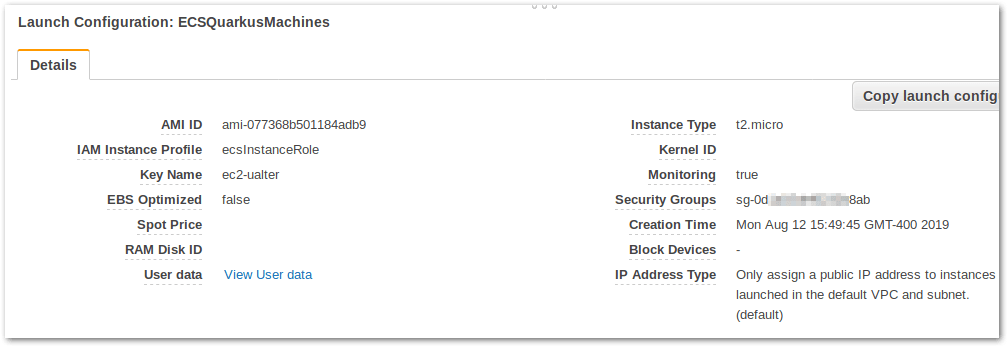
- Image Id: the Id of the AMI (Amazon Machine Image) we will use to generate instances. That’s the blueprint of the Virtual Machine we want. You could choose one created by yourself, but, in the case of AWS ECS Cluster, Amazon already offers some AMI prepared to be used. They are listed at the AWS Marketplace, if you search there with the keyword “ecs”, you’ll see some of them. We’ve have chosen one of the options listed, a simple and Free tier eligible Instance, and its id is “ami-077368b501184adb9”.
- Security Group: that’s the virtual firewall, incoming rules that will be attached to our EC2 Instance, we have already created and save its Id to an environment variable.
- Instance Type: besides the AMI itself, we also have to specify the EC2 instance type, the combination of computing, memory and networking resources, the Instances will have available. We will choose “t2.micro”.
- Key Name: this is the name of the key pair you have created once and will be used to access those EC2 Instances (SSH).
- IAM Instance Profile: The IAM Role for our EC2 instances, in order to automatically have AWS security credentials available to operate necessary AWS resources.
- User Data: this is the bash script content that will be executed once the instance gets started. We specify this script using a file called userData.txt, here we have it:
### userData.txt
#!/bin/bash
cat <<'EOF' >> /etc/ecs/ecs.config
ECS_CLUSTER=quarkus-ec2
EOF
With all those parameters specified, we can fire the command line to create the Launch Configuration resource.
### Create Launch Configuration (EC2 AMI) - used for AutoScaling Configuration
$ aws autoscaling create-launch-configuration --launch-configuration-name "ECSQuarkusMachines" --image-id ami-077368b501184adb9 --security-groups $SG_ID --user-data file://userData.txt --instance-type t2.micro --iam-instance-profile ecsInstanceRole --key-name ec2-ualter
Now, choose the Subnets Ids for the AutoScaling, that is, specifying in which Availability Zones could be created EC2 Instances for our ECS Cluster when the AutoScaling fires a Scaling Out operation.
Following, with everything set up to create our AutoScaling resource, we specify a few more parameters, like the Target Group (Load Balancer Listener) where this Instance must be registered as a Target, the minimum size and desired capacity of value 1. In this manner, as the moment we fire the command line, in a few seconds an EC2 Instance of the AMI we have chosen it will be started.
### Choose the Subnets where can be create the EC2 Instances
$ SUBNETS_IDS_AUTOSCALING=$(aws ec2 describe-subnets --filters Name=vpc-id,Values=$VPC_ID | jq -r '.Subnets[].SubnetId' | tr '\n' ',')

### Create the Autoscaling
$ aws autoscaling create-auto-scaling-group --auto-scaling-group-name "ECSQuarkusAutoScalingGroup" --launch-configuration-name "ECSQuarkusMachines" --min-size 1 --max-size 3 --desired-capacity 1 --vpc-zone-identifier $SUBNETS_IDS_AUTOSCALING --target-group-arns $TARGET_GROUP --health-check-type "EC2" --health-check-grace-period 30 --default-cooldown 32 --tags Key=Name,Value=Quarkus-EC2-Instance,PropagateAtLaunch=true
Ok, here we can see the Instance created automatically by the AutoScaling Group:
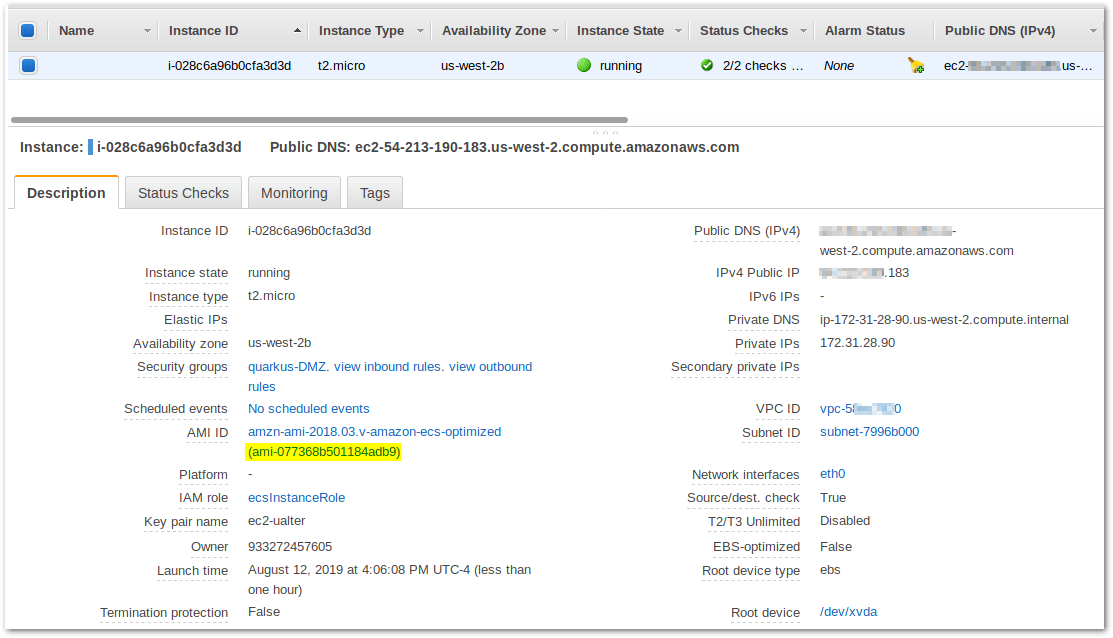
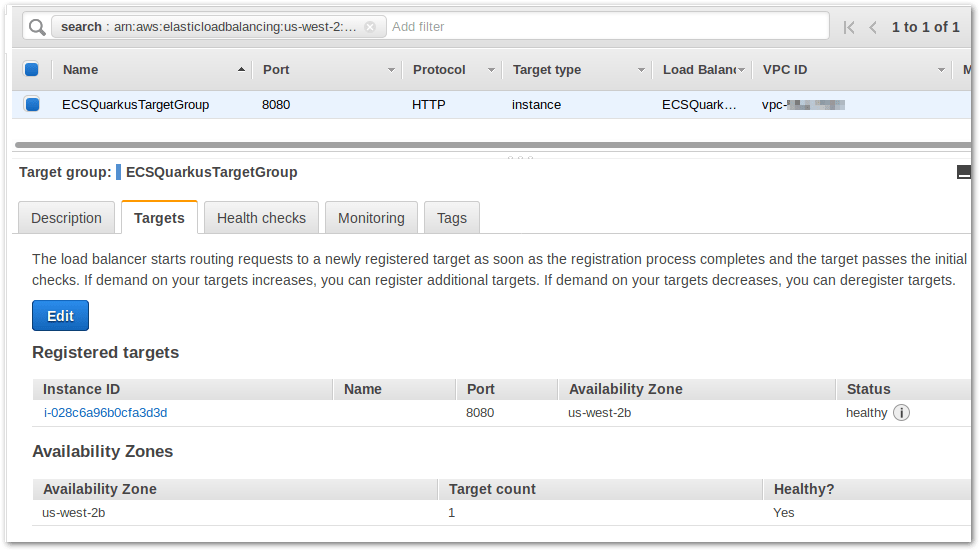
Checking the associated Listener(the Target Group) of our Application Load Balancer, we can see now the Instance created as part of the Registered Targets, where the network traffic will be distributed (note that, in the case of Fargate Lab, here we see Private IPs of ENI, not Instances IDs).
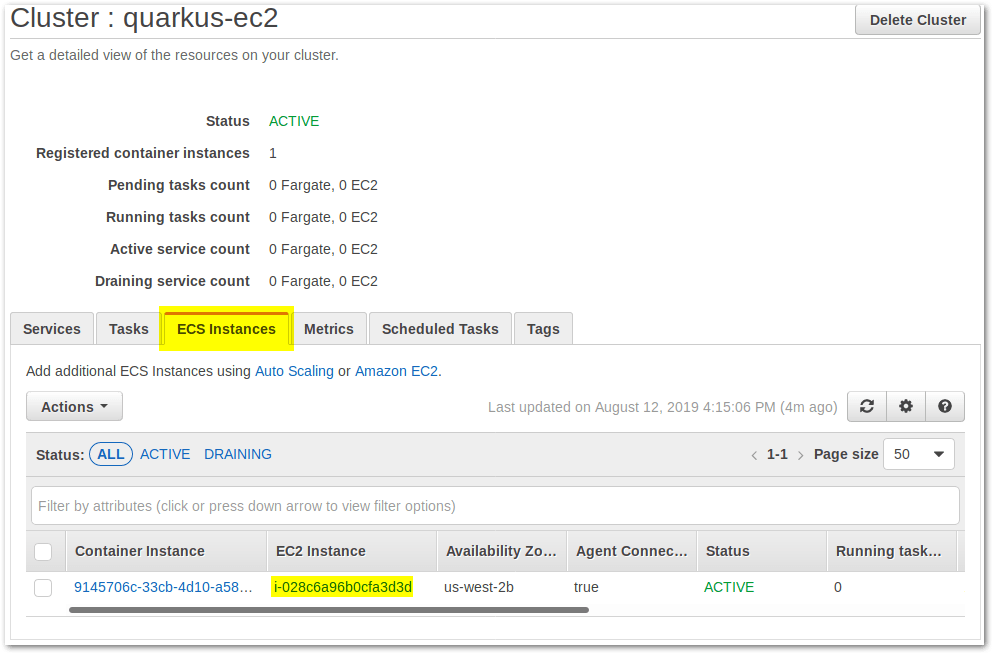
And if we now check our ECS Cluster created previously, at the ECS Instances Tab we should find it there the EC2 recently created as one of the servers available to deploy instances of Tasks.
Well, let’s move on, now to the ECS Service creation, this part it doesn’t change too much comparing with the ECS Fargate Lab.
AWS ECS Service
At the creation of the ECS Service, as we did in the previous article where we use a JSON File template to specify all the entry parameters for the creation of the ECS Service, here we will do the same. So, we have to replace all the variables (PlaceHolders) inside this JSON template file (service-definition-ec2-template.json) in order to have this one valid to pass as an entry parameter to the command line.
### Preparing the JSON Template with the Values - Replace the variables
$ cat service-definition-ec2-template.json | sed 's~$TARGET_GROUP~'"$TARGET_GROUP"'~' > service-definition-ec2.json

### Then, create the Service with the JSON file
$ aws ecs create-service --cli-input-json file://service-definition-ec2.json
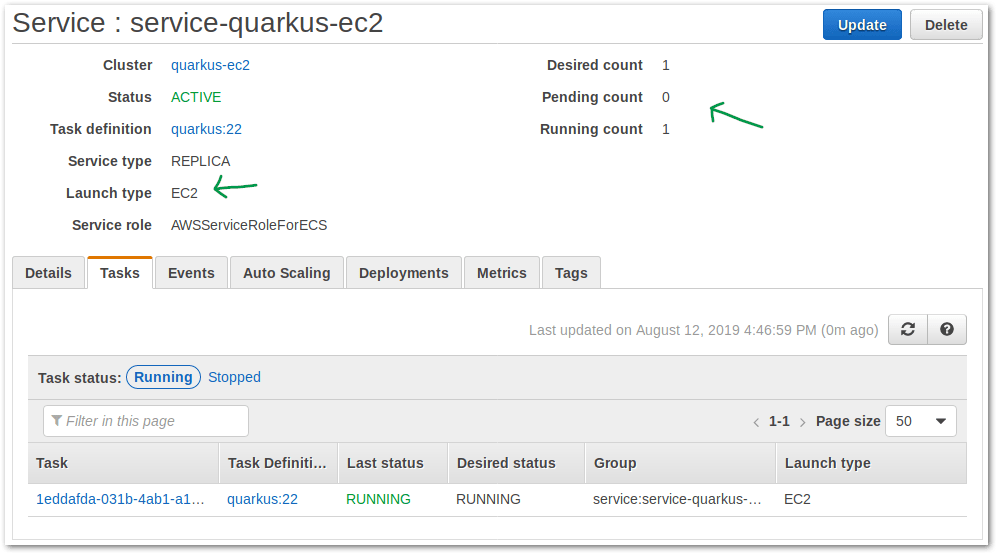
Here our ECS Service created with one running Task:
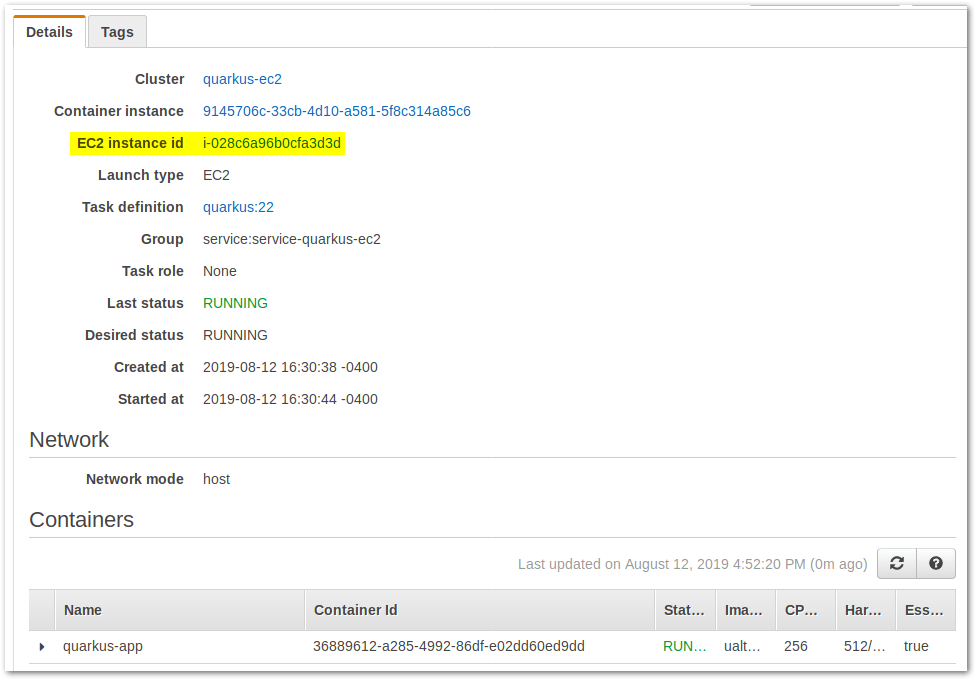
If we click on the Task link to see more details of it, we could notice in which EC2 Instance this Task (container instance) is running at.
Testing AWS ECS Service
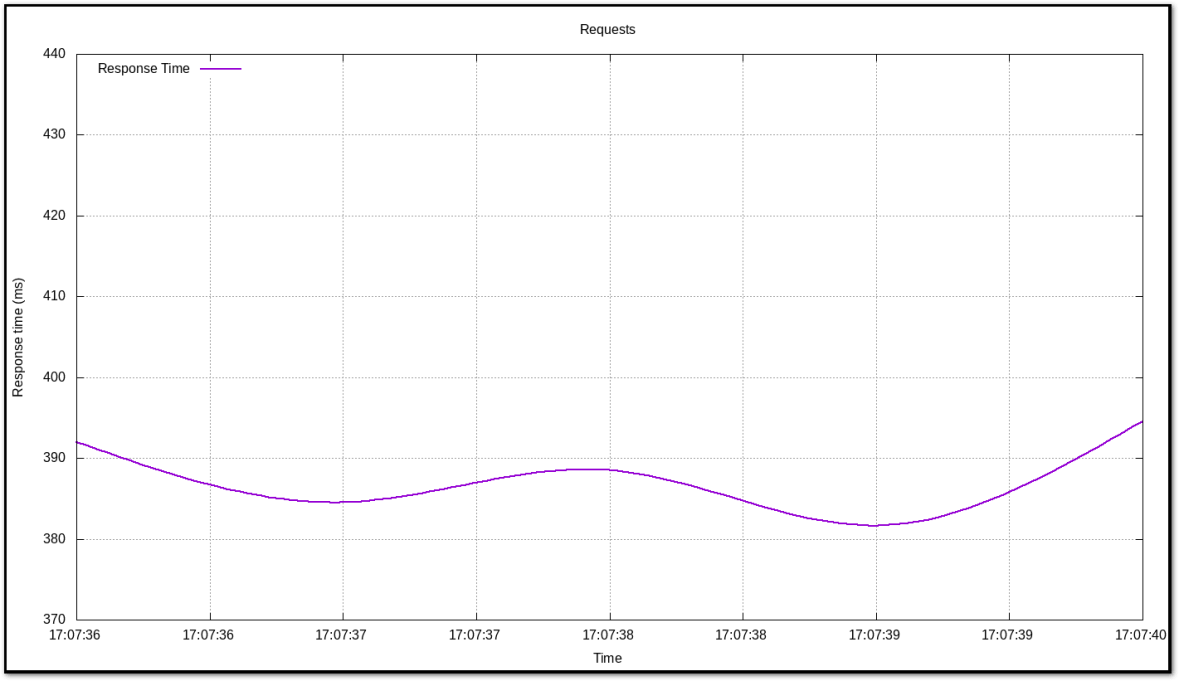
Let’s fire some requests over our ALB to check our ECS Service with EC2 launch type working. We are going to use the same pair of command-line tools in the first part of this article, the Apache Benchmark, and Gnuplot.
Let’s do some preparation, like get the URL of our Application Load Balancer (DNS Name) to use at the tests and following, using Apache Benchmark, we will fire 500 requests with 5 requests being fired at a time.
### ALB URL
ELB_URL=$(aws elbv2 describe-load-balancers | jq -r '.LoadBalancers[] | select( .LoadBalancerName | contains("ECSQuarkus")) | .DNSName')

### Doing a little check before start  :-)
curl -w "\n" $ELB_URL:8080/hello/greeting/Ualter
Hello from Quarkus, Ualter

*Server_IP --> 172.31.28.90

### If worked the simple command, let the Apache Benchmark do its job
$ ab -n 500 -c 5 -g data.tsv "http://$ELB_URL:8080/hello/greeting/Visitor/"
This is ApacheBench, Version 2.3 <$Revision: 1843412 $>
Copyright 1996 Adam Twiss, Zeus Technology Ltd, http://www.zeustech.net/
Licensed to The Apache Software Foundation, http://www.apache.org/

Benchmarking ECSQuarkusLoadBalancer-5164351414.us-west-2.elb.amazonaws.com (be patient).....done


Server Software:
Server Hostname:        ECSQuarkusLoadBalancer-5143261274.us-west-2.elb.amazonaws.com
Server Port:            8080

Document Path:          /hello/greeting/Visitor/
Document Length:        56 bytes

Concurrency Level:      5
Time taken for tests:   4.293 seconds
Complete requests:      500
Failed requests:        0
Total transferred:      9550 bytes
HTML transferred:       2800 bytes
Requests per second:    11.65 [#/sec] (mean)
Time per request:       429.345 [ms] (mean)
Time per request:       85.869 [ms] (mean, across all concurrent requests)
Transfer rate:          2.17 [Kbytes/sec] received

Connection Times (ms)
              min  mean[+/-sd] median   max
Connect:      182  189   9.1    189     247
Processing:   187  197   9.2    194     238
Waiting:      187  196   9.3    193     237
Total:        372  386  13.2    383     438

Percentage of the requests served within a certain time (ms)
  50%    383
  66%    387
  75%    392
  80%    395
  90%    399
  95%    410
  98%    438
  99%    438
 100%    438 (longest request)
To check the result of the 500 requests we will plot the measured values (parameter -g above in Apache Benchmark generated a file for Gnuplot) in a simple graph with Gnuplot. (The parameters/commands specified for the Gnuplot command line, can be found here: apache-benchmark.p)
### Generated the Graph of the Apache Benchmark measured values with Gnuplot
$ gnuplot -e "TITLE='Requests'" -e "LINE='Response Time'" -e "PLOT=4" apache-benchmark.p

### Open the Graph Image at Linux Ubuntu
$ eog benchmark-4.png
### Open the Graph Image at Mac OS
$ open benchmark-4.png
The results…
Clean Up
It is important to remove the resources we have created in this Lab, let’s clean them up, every one of the AWS resources. It could cost some money if we forget them there, even if we are still eligible for the 12-Month Free Tier AWS Plan.
### Update AutoScaling Group MinSize to Zero Instances
$ aws autoscaling update-auto-scaling-group  --auto-scaling-group-name "ECSQuarkusAutoScalingGroup" --min-size 0 --desired-capacity 0 --max-size 0

### Delete AutoScaling Group
$ aws autoscaling delete-auto-scaling-group --auto-scaling-group-name "ECSQuarkusAutoScalingGroup" --force-delete

### Delete Launch Configuration
$ aws autoscaling delete-launch-configuration --launch-configuration-name "ECSQuarkusMachines"

### Delete Load Balancer / Target Group
$ aws elbv2 delete-load-balancer --load-balancer-arn $ELB
### Wait, until ELB be already deleted, otherwise it will message that it's being in used yet
$ aws elbv2 delete-target-group --target-group-arn $TARGET_GROUP

### Delete Service
$ aws ecs update-service --service service-quarkus-ec2 --desired-count 0 --cluster quarkus-ec2
$ aws ecs delete-service --cluster "quarkus-ec2" --service "service-quarkus-ec2"
### (It is necessary that all the instances be down already before remove it, It takes awhile)
$ aws ecs delete-cluster --cluster quarkus-ec2

### Delete Task Definition
$ aws ecs deregister-task-definition --task-definition "quarkus:22"
### or (all revisions, if more than 1)
$ for i in {1..10}; do aws ecs deregister-task-definition --task-definition quarkus:$i ; done
Conclusion
It is clear, as expected, that using the AWS ECS with EC2 launch type we have more work to do, it is our responsibility to take care of the provisioning and managing of the EC2 Instances, just like we would usually do for others AutoScaling group related to any ordinary deployed (Web) Application, and then later make the use of some metrics/alarms to scaling it accordingly.
And why should I choose EC2 instead of Fargate launch type for AWS ECS Cluster? Well, it seems to be clear that the Fargate would be a better choice as it is easier and more straightforward to manage. However, one thing the EC2 Launch Type offers it is more granularity control, it takes off the easiness of the Cluster managing but in change gives you the total control of where the Container instances are running at. Because at the end it is indeed an existent Virtual Machine (EC2 Instance) that you can enter (SSH) and operate at this level. It depends on the scenario, maybe it is needed. Otherwise, probably the Fargate fulfill the requirements nicely.
One last thing… we didn’t cover the Auto Scaling at the container level (running Tasks), neither at Part I (Fargate) nor at Part II (EC2), we are able to control the scaling of the running Tasks based on some metrics/alarms (CPU, Memory). That’s another option that we could use to automatically provisioning Container Instances.

